by
by Cisco Network Security Services
Today I will discuss about Cisco Network Security issue. Switches can have a number of network services enabled. Many of these services are typically not necessary for a switch’s normal operation; however if these services are enabled then the switch may be susceptible to information gathering or to network attacks. The characteristics or the poor configuration of the network services on a switch can lead to compromise. Most of these services use one of the following transport mechanisms at Layer 4 of the OSI RM: Transmission Control Protocol (TCP) and User Datagram Protocol (UDP).
If possible, instead of using a network service (e.g., telnet) to perform in-band management of a switch, use out-of-band management (e.g., via the console port) for each switch. Out-of-band management reduces the exposure of configuration information and passwords better than in-band management.[bodyads]
- 1. Unnecessary Network Services
If possible, disable each unnecessary network service on each switch. The following Cisco Network Security commands will disable services of concern. In some cases, the Cisco Network Security commands affect the switch globally, while in other cases the commands affect only a single interface.
Below is an example for the set of interfaces that includes GigabitEthernet 6/1 through 6/3.
SWITCH(config)# interface range gigabitethernet 6/1 – 3
- 1.1. TCP and UDP Small Servers – TCP/UDP Ports 7, 9, 13, 19
Cisco provides support for “small servers” (e.g., echo, discard, daytime and chargen). Two of these servers, echo and chargen, can be used in denial-of-service attacks against one or more switches. These services can be disabled using the following Cisco Network Security commands.
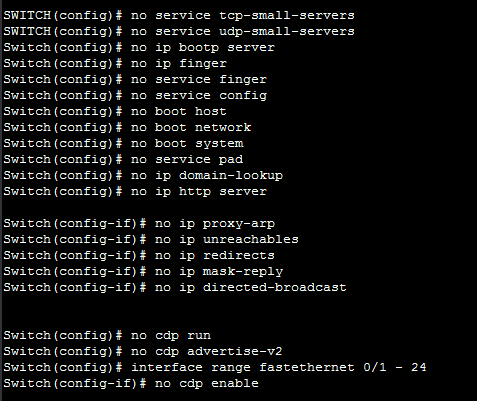
SWITCH(config)# no service tcp-small-servers
SWITCH(config)# no service udp-small-servers
- 1.2. Bootp Server – UDP Port 67
A Cisco switch can act as a bootp server to distribute system images to other Cisco systems. Unless this is an operational requirement, it is best to disable this service with the following Cisco Network Security command to minimize unauthorized access to the switch’s system image.
Switch(config)# no ip bootp server
- 1.3. Finger – TCP Port 79
Cisco switches support the finger service, which can provide information about users currently logged onto the switch. Either of the following Cisco Network Security commands will disable finger service. The first command will replace the second command in future versions of IOS.
Switch(config)# no ip finger
Switch(config)# no service finger
- 1.4. Configuration Autoload
A Cisco switch can obtain its configuration from a network server via a few methods. These methods are not recommended because configuration information is passed in clear text during the boot process and can be collected by unauthorized users. Use the following Cisco Network Security commands to disable these methods.
Switch(config)# no service config
Switch(config)# no boot host
Switch(config)# no boot network
Switch(config)# no boot system
- 1.5. Packet Assembler/Disassembler (PAD)
PAD enables X.25 connections between network systems. Unless a network requires this capability the PAD service should be disabled with the following Cisco Network Security command.
Switch(config)# no service pad
- 1.6. Address Resolution Protocol (ARP)
Normally, ARP messages are confined to a single broadcast domain, but a switch can proxy ARP messages from one domain to another. Unless a switch is required to be an intermediary for ARP requests, this feature should be disabled with the following Cisco Network Security commands on each interface where it is not required.
Switch(config-if)# no ip proxy-arp
- 1.7. Internet Control Message Protocol (ICMP) Messages
A Cisco switch can generate automatically three types of ICMP messages: Host Unreachable, Redirect and Mask Reply. The Mask Reply message provides the subnet mask for a particular network to the requester. An attacker can use these messages to aid in mapping a network. Disabling these messages with the following Cisco Network Security commands is recommended for each interface and for the Null 0 interface.
Switch(config-if)# no ip unreachables
Switch(config-if)# no ip redirects
Switch(config-if)# no ip mask-reply
The Null 0 interface deserves particular attention. This interface is a packet sink. It is sometimes utilized in denial-of-service attack prevention and all blocked packets are forwarded to this interface. It will generate Host Unreachable messages that could flood the network unless the facility is disabled. Attackers might also be able to use these messages to determine access-control list configuration by identifying blocked packets.
Directed broadcasts allow broadcast messages initiated from different broadcast domains than are locally attached to the switch. For example, attackers have used ICMP directed broadcasts for this purpose. It is recommended that this broadcast capability be turned off, using the following Cisco Network Security command on each interface.
Switch(config-if)# no ip directed-broadcast
[adsense]
- 2. Potentially Necessary Network Services
Certain network services may be necessary for the administration of a switch. If in-band management or a specific network service is necessary, then consider the following subsections for configuring network services more securely.
Set up a unique account for each administrator for access to any necessary network service. The following commands present an example that creates an account (e.g., shahed) with a privilege level (e.g., 0). This account is local to the switch only. Privilege level 0 is the lowest level on Cisco switches and allows a very small set of commands. The administrator can go to a higher level (e.g., 15) from level 0 using the enable command.
Switch(config)# username shahed privilege 0
Switch(config)# username shahed secret g00d-P5WD
- 2.1. Domain Name System (DNS) – TCP Port 53 and UDP Port 53
To specify a DNS server for name resolution, use the ip name-server command. This command can be used to set up to six DNS servers. The following example sets the IP address of 10.1.200.97 as the DNS server.
Switch(config)# ip name-server 10.1.200.97
To enable the DNS-based hostname-to-address translation, use the ip domain-lookup command. This command allows DNS broadcast queries from the switch to be resolved by a DNS server.
Switch(config)# ip domain-lookup
In some cases, the administrator may not want this DNS query capability. For example, if the administrator types a command incorrectly, then the switch may attempt to resolve the mistyped string to an IP address. This attribute can cause undesirable delay. Thus, use the following Cisco Network Security command to disable the capability if necessary.
Switch(config)# no ip domain-lookup
To specify a default domain name to complete unqualified hostnames, use the ip domain-name command. The following Cisco Network Security example sets the domain name to test.lab using this command.
Switch(config)# ip domain-name test.lab
- 2.2. Secure Shell (SSH) – TCP Port 22
If remote access to a switch is necessary, then consider using SSH instead of telnet. SSH provides encrypted connections remotely. However, only IOS versions that include encryption support SSH. Also, to include SSH capability the switch may need to have its IOS updated.
Before using SSH on the switch, the administrator must configure the switch with the following commands: hostname, ip domain-name, and crypto key generate rsa. The following example sets the hostname to Switch.
Switch(config)# hostname Switch
Refer to the previous subsection on DNS for an example using the ip domain-name command.
The crypto key generate rsa command depends on the hostname and ip domain-name commands. This crypto command generates a Rivest, Shamir, Adleman (RSA) key pair, which includes one public RSA key and one private RSA key.
The following example shows this crypto command, including the two parameters, the name for the keys (e.g., switch.test.lab) and the size of the key modulus (e.g., 1024), that are prompted for.
Switch(config)# crypto key generate rsa
The name for the keys will be: switch.test.lab
Choose the size of the key modulus in the range of 360 to 2048 for your General Purpose Keys. Choosing a key modulus greater than 512 may take a few minutes.
How many bits in the modulus[512]? 1024
Generating RSA keys…. [OK].
To restrict SSH access to the switch, configure an extended access-list (e.g., 101) that allows only the administrators’ systems to make these connections and apply this access-list to the virtual terminal lines. Allow only SSH connections to these lines by using the transport input ssh command. Set the privilege level to 0, and set the exec-timeout period to 9 minutes and 0 seconds to disconnect idle connections to these lines. Finally, use the login local command to enable local account checking at login that will prompt for a username and a password.
The following Cisco Network Security commands show the example configuration for SSH on the virtual terminal lines:
Switch(config)# access-list 101 remark Permit SSH access from administrators’ systems
Switch(config)# access-list 101 permit tcp host 10.1.6.1 any eq 22 log
Switch(config)# access-list 101 permit tcp host 10.1.6.2 any eq 22 log
Switch(config)# access-list 101 deny ip any any log
Switch(config)# line vty 0 4
Switch(config-line)# access-class 101 in
Switch(config-line)# transport input ssh
Switch(config-line)# privilege level 0
Switch(config-line)# exec-timeout 9 0
Switch(config-line)# login local
The login local command cannot be used with AAA. Instead, use the login authentication command.[boxads]
- 2.3. Telnet Server – TCP Port 23
If the administrator cannot upgrade the switch to an IOS version with SSH, then restrict telnet access to the switch. Configure an extended access-list (e.g., 102) that allows only the administrators’ systems to make these connections and apply this access-list to the virtual terminal lines. Allow only telnet connections to these lines by using the transport input telnet command. Set the privilege level to 0, and set the exec-timeout period to 9 minutes and 0 seconds to disconnect idle connections to these lines. Finally, use the login local command to enable local account checking at login that will prompt for a username and a password.
The following Cisco Network Security commands show the example configuration for telnet on the virtual terminal lines.
Switch(config)# access-list 102 remark Permit telnet access from administrators’ systems
Switch(config)# access-list 102 permit tcp host 10.1.6.1 any eq 23 log
Switch(config)# access-list 102 permit tcp host 10.1.6.2 any eq 23 log
Switch(config)# access-list 102 deny ip any any log
Switch(config)# line vty 0 4
Switch(config-line)# access-class 102 in
Switch(config-line)# transport input telnet
Switch(config-line)# privilege level 0
Switch(config-line)# exec-timeout 9 0
Switch(config-line)# login local
The login local command cannot be used with AAA. Instead, use the login authentication command.
- 2.4. Hyper Text Transfer Protocol (HTTP) – TCP Port 80
An HTTP server is included in IOS to allow remote administration of the switch through a web interface. If web-based administration of the switch is not necessary, then disable the HTTP server using the following Cisco Network Security command.
Switch(config)# no ip http server
- 2.5. Simple Network Management Protocol (SNMP) – UDP Ports 161, 162
SNMP is a service used to perform network management functions using a data structure called a Management Information Base (MIB). Unfortunately, SNMP version 1 is widely implemented but not very secure, using only clear-text community strings for access to information on the switch, including its configuration file.
If SNMP is not being used, then executing the following Cisco Network Security commands will disable the service:
Switch(config)# no snmp-server community
Switch(config)# no snmp-server enable traps
Switch(config)# no snmp-server system-shutdown
Switch(config)# no snmp-server
- 2.6. Cisco Discovery Protocol (CDP)
CDP provides a capability for sharing system information between Cisco routers, switches and other products. Some of this information includes VLAN Trunking Protocol (VTP) domain name, native VLAN and duplex. If this information is not required for operational needs, then it should be disabled globally and disabled on each interface (e.g., physical, Virtual LAN {VLAN}). To disable CDP globally on a switch, use the no cdp run command. To disable CDP on an interface on a switch, use the no cdp enable command. The following Cisco Network Security commands provide an example, including how to disable advertising CDP version 2 on a switch.
Switch(config)# no cdp run
Switch(config)# no cdp advertise-v2
Switch(config)# interface range fastethernet 0/1 – 24
Switch(config-if)# no cdp enable
If CDP is necessary, then it needs to be enabled globally and enabled only on interfaces where it is necessary. The following Cisco Network Security commands provide an example of disabling CDP on one interface while enabling CDP on another interface.
Switch(config)# cdp run
Switch(config)# interface VLAN10
Switch(config-if)# no cdp enable
Switch(config)# interface VLAN101
Switch(config-if)# cdp enable